カテゴリー
SugiBlog Webエンジニアのためのお役立ちTips

nth-childやnth-of-type等を上手に使う

CSSのnth-childnth-of-type等の擬似要素を使えば兄弟要素の何番目の要素に対してのみスタイルを適用する等、理解して使えば柔軟なスタイル設定が可能です。
自身の備忘録のためにも書き留めておきたいと思います。

:first-child, :first-of-type

兄弟要素のうち最初の要素を指定します。
■□□□□□□□□□□

:last-child, :last-of-type

兄弟要素のうち最後の要素を指定します。
□□□□□□□□□□■

:nth-child(A), :nth-of-type(A)

兄弟要素のうちA番目の要素を指定します。
□□■□□□□□□□□

:nth-last-child(n), :nth-last-of-type(n)

兄弟要素のうち最後からn番目の要素を指定します。
□□□□□□□□■□□

:nth-child(-n+A), :nth-of-type(-n+A)

兄弟要素のうち先頭からA個の要素を指定します。
■■■□□□□□□□□

:nth-child(n+A), :nth-of-type(n+A)

続きを読む…»

44 views

CSSで変数として使える便利なカスタムプロパティ

CSS変数やカスケード変数とも呼ばれることもあるカスタムプロパティ。
変数のように使えるので何かと便利です。

カスタムプロパティはハイフン2つで始まる名前とプロパティ値を設定します。

基本的な文法はこのようになります。

element {
    --main-bg-color: brown;
}

よく使われる方法はカスタムプロパティを:root擬似クラスで定義することで、HTML全体で使用することが可能になります。

:root {
    --main-bg-color: brown;
}

カスタムプロパティの名前は大文字小文字が区別されます。

実際に使用するときはこのようになります。

element {
    background-color: var(--main-bg-color);
}

また、指定された変数が定義されていない場合の代替値を指定することができます。

element {
    background-color: var(--main-bg-color, black);
    /* --main-bg-colorが定義されていなければblack */
}

カスタムプロパティを活用すれば共通で設定するようなプロパティで使用し、デザイン変更等の効率を上げることができます。
例えば色指定関係をまとめておけば、変更したいときに全て書き換えるという手間が省けますね。

292 views

コンテンツを中央寄せする便利な方法

コンテンツをテキストは左揃えで中央寄せしたいとき、これまでラッパーとしてdiv等で囲み、flexを使ったり、幅を決めてmargin: 0 auto;を使ったりしていました。
しかし、もう少し簡単にできる方法があったのでご紹介します。

これまでのやり方例

<div>
    <ul>
        <li>Sea sit et duo</li>
        <li>Labore velit enim gubergren</li>
        <li>Duo kasd amet clita</li>
        <li>Eirmod takimata est possim</li>
        <li>Nobis sed sed justo</li>
        <li>Clita sit erat iriure</li>
    </ul>
</div>

ラッピングしたdivflexを設定

div {
    display: flex;
    justify-content: center;
}

gridでも同じようなレイアウトにできます。

div {
    display: grid;
    justify-content: center;
}

div等でラッピングせずにやる方法

<ul>
    <li>Sea sit et duo</li>
    <li>Labore velit enim gubergren</li>
    <li>Duo kasd amet clita</li>
    <li>Eirmod takimata est possim</li>
    <li>Nobis sed sed justo</li>
    <li>Clita sit erat iriure</li>
</ul>

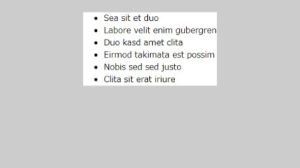
ulをコンテンツの幅で表示するようにし、中央寄せにする

ul {
    max-inline-size: max-content;
    margin-inline: auto;
}

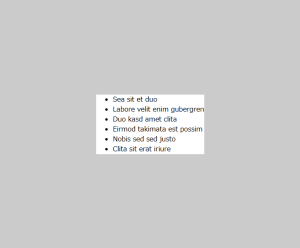
表示結果

IE以外のブラウザは対応しているようなので問題なく使用できると思います。

justify-content – CSS: カスケーディングスタイルシート | MDN

上下左右中央揃え

上下左右共に中央揃えしたいときはplace-contentを使います。

html, body {
    margin: 0;
    padding: 0;
    height: 100%;
}
div {
    display: grid;
    place-content: center;
    height: 100%;
}

表示結果

place-content – CSS: カスケーディングスタイルシート | MDN

425 views

ソーシャルボタンを綺麗に並べる

ブログ記事等に設置しておきたいSNSのボタンを綺麗に並べる方法

ボタンはulタグでli内に設置します。
そしてinline-blockで表示し、縦位置を上にすればOK。

.social_buttons{
    text-align: left;
}
 
.social_buttons > li {
    display: inline-block;
    vertical-align: top;
    margin: 0;
}
 
.social_buttons > li:first-child {
    margin-left: 0;
}
 
.social_buttons > li:last-child {
    margin-right: 0;
}
 
.social_buttons iframe {
    margin: 0 !important;
}
 
@media screen and (max-width: 780px){
    .social_buttons > li{
        width: 80px !important;
        margin: 0 7px 10px 0;
    }
}
1,523 views

CSSだけでボタン装飾を作るサンプル

画像を使わずにそれっぽく見せる方法

HTML

<div id="sample_button_wrapper">
    <div id="sample_button_body">
        <a href="#">Sample Button</a>
    </div>
</div>

CSS

div#sample_button_wrapper {
    border-radius: 7px;
    background: #f5f5f5;
    border: 1px solid #ccc;
    display: inline-block;
    padding-bottom: 3px;
    box-shadow: 0 2px 3px #ccc;
}

div#sample_button_body {
    background: #fff;
    border-radius: 7px;
}

div#sample_button_body a {
    color: #333;
    text-decoration: none;
    display: block;
    padding: 8px 15px 5px 15px;
}

表示例)

色を付けたパターン

HTML

<div id="sample_button_wrapper2">
    <div id="sample_button_body2">
        <a href="#">Sample Button 2</a>
    </div>
</div>

CSS

div#sample_button_wrapper2 {
    border-radius: 7px;
    background: #006699;
    display: inline-block;
    padding-bottom: 5px;
    box-shadow: 0 2px 3px #999;
}
div#sample_button_body2 {
    background: #0099cc;
    border-radius: 7px;
}
div#sample_button_body2 a {
    color: #fff;
    text-decoration: none;
    display: block;
    padding: 8px 15px 4px 15px;
}

表示例)

1,781 views